Hi Everyone !
In my previous post, you saw how we can bypass a third party(Rootbeer) root detection mechanism. Now, we will analyze a different third party library on a different platform. The library named JailMonkey is a React Native library for detection if a phone has been jail-broken or rooted for iOS/Android. In this article, I will analyze the library prepared for the iOS operating system, not for the Android version.
I will continue through an application available in the App Store. Therefore, I will not share the package name. I’m not sure, but I remember that the same library is available in DVIAv2. You can also test it yourself through this application;
Damn Vulnerable iOS App (DVIA)
I divided article into two subheadings. In the first one, we will use Frida to detect the target class in the application through keywords. Then we will detect and hook the value returned on the function and jailbroken device. In the second subheading, we will analyze how the JailMonkey library works and how the functions return.
Let’s start !
Mach-O

First of all, it is useful to learn the format of the executable file superficially…
When you analyze any ipa archive or the directory where an application you downloaded from the App Store is installed, you will see the executable file under the AppName.app/ directory. That is a type of file called Mach-O, which can be run on iOS and OS X operating systems. Apple iOS stores multiple executable files in Mach-O format by embedding them in a single file.
Third party libraries, executable files, object code and various file types are compiled in the respective file. Here we will examine the library named JailMonkey among these third libraries.
FIND CLASS AND FUNCTION
The reason I traced using Frida is the ObjC.classes method in the JavaScript API.

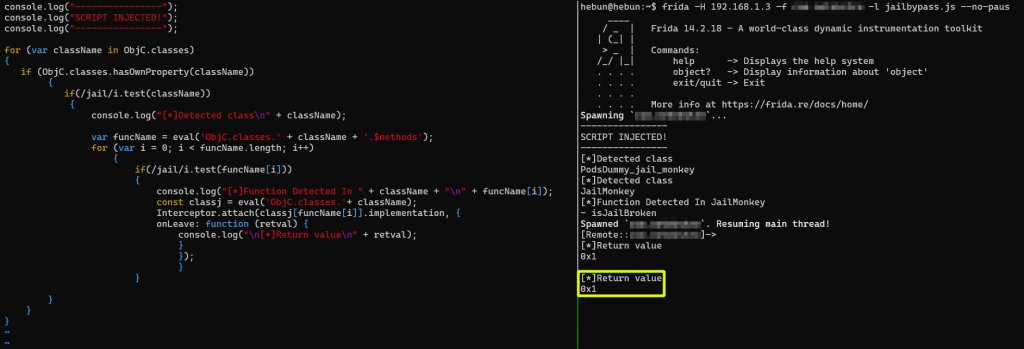
In the screenshot above, I would like to list the classes with the ObjC.classes property via hasOwnProperty(). ObjC.classes is a method that mapping classes with the ObjC.Object JavaScript binding on the current application.
I also want to detect classes that contain only the word “jail” using regexp. When you don’t use it, it will list all the classes in Mach-O file, which means too much output.
Two different classes that contain the word jail were identified. The target function can be in either class. Therefore, it is useful to proceed through two different classes. The second task is to detect the function in the classes.

I have listed the functions that contain the word jail in the classes that pass the relevant if condition using regexp again. The reason I defined the funcName variable in the eval method was to verify that the code is a JavaScript method.
A function named “- isJailBroken” was detected in the JailMonkey class from the outputs. The next goal will be to determine the return value of the relevant function.

I got the return value in the isJailBroken function of the JailMonkey class via Interceptor. The value returned in the log output was 0x1, so it was true. What we need to do is replace the retval variable we created as an example and hook it false. So 0x0…
console.log("----------------");
console.log("SCRIPT INJECTED!");
console.log("----------------");

for (var className in ObjC.classes)
{
   if (ObjC.classes.hasOwnProperty(className))
        {
           if(/jail/i.test(className))
            {
                console.log("[*]Detected class\n" + className);

                var funcName = eval('ObjC.classes.' + className + '.$methods');
                for (var i = 0; i < funcName.length; i++)
                    {
                        if(/jail/i.test(funcName[i]))
                        {
                            console.log("[*]Function Detected In " + className + "\n" + funcName[i]);
                            const classj = eval('ObjC.classes.'+ className);
                            Interceptor.attach(classj[funcName[i]].implementation, {
                            onLeave: function (retval) {
                                console.log("\n[*]Return value\n" + retval);
                                retval.replace(0x0);
                                console.log("\n[*]New value\n" + retval);
                                }});
                                }
                        }
        }
    }
}
I hooked the value 0x1 to 0x0 in the last state of the code and the warning message disappeared when the app is opened. So Jailbreak detection was bypass.
If we summarize what has been done briefly, we have determined the classes and functions in which contains “jail” in the executable file. After that, we hooked the target function to make it look like a non-jailbroken device.
Yes, I hooked a function and made the warning message disappear. But how did this happen? What is checked in the isJailBroken function?
Let’s analyze the functions of the related library for the answers.
APPENDIX: ANALYZE VIA disassembler
I will use the tool called Ghidra. After getting the Mach-O executable file to your local with scp protocol, import the relevant file to Ghidra and start the analysis process.
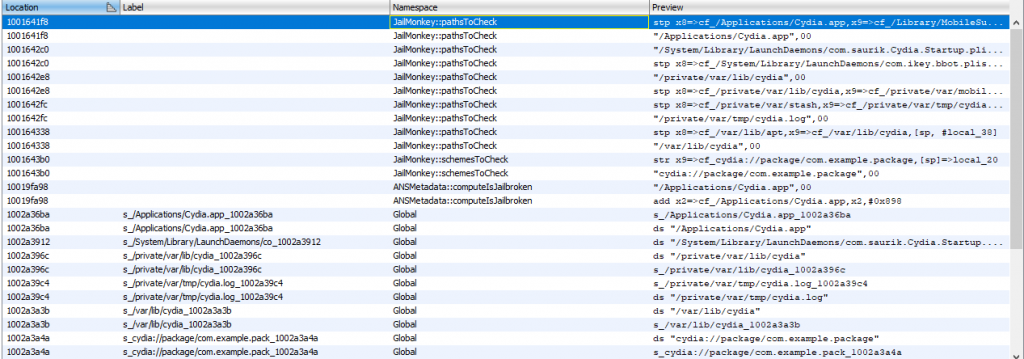
After the analysis process is completed, I always try to trace keywords.s. For example, I would use the word “xbin” for root detection. For JailBreak, I’ll search for the word “Cydia“.

I will continue with class::function statements instead of Global for find target class and function. Because this Namespace structure shows that “Cydia” means that the target class is included in a function. Also, It may mean that the corresponding function can perform a query with the word Cydia.

In the screenshot on the left, the directories and files that may be on a jailbroken device are defined in pathsToCheck function.
NSArray represents that the related function is an Array function. I might be wrong as I am weak on Objective-C, but as far as I understand msgSend returns Array list-added variables. And I think retainAutoreleasedReturnValue keeps the constant return of this function.
We are sure that this function is used in a different place. What we need to do for this is to search for the pathsToCheck function and determine the class::function.

I’ll explain as much as I understand through keywords. The variables in the pathsToCheck function were listed with NSArray. In the checkPaths function, the local presence of files in the pathsToCheck function is checked via NSFileManager. If a file representing Jailbreak is detected on the device, a value of true(uVar4) will be assigned. Then the variable passes through the AND operator with 1, and since it is not equal to 0, the checkPaths function will return 1, so it is true.
Now, we need to check if this function’s returning true value makes be useful for other functions.

The value returned from three different functions has been put in the if condition. Even if the checkPaths and checkSchemes functions return 0, the response returned by the canViolateSandbox function inside is referenced. This function writes a txt file to the private/ directory to check via NSFileManager if the sandbox mechanism is working.
Boolean values received for Root detection or Jailbreak detection are usually taken under a single function and return the final value. This means that it is enough to hook the isJailMonkey function. Due to this situation, it was enough to hook the isJailBroken function with Frida.
CONCLUSION
I wrote this article as a motivation to develop myself in the field of mobile security and reverse engineering. Third-party libraries that provide Root detection and Jailbreak detection can now be bypassed by third-party applications(Magisk, Liberty Lite etc.). In cases where these applications do not work, we have seen how we can trace them with keyword. I can’t call this post a guide, but at least it can help you because it contains keywords.
You can make the script I prepared in the first subtitle more organized with try/catch. In addition, I will cleap up my script on GitHub whenever I have the opportunity.
I hope it was a useful writing. If the article has missing or wrong informations, please contact me. Remember…
Knowledge increases with sharing…
References
For Objective-C methods
For JavaScript API
For more detailed information about Mach-O

