Hi everyone !
It’s been a long time. During this time, I continued to improve myself in web application security. I want to move my work on advance level web security to my blog soon. But today I want to introduce a new series to you. Mobile Security…
I am actually not new to the mobile world, there was a time when I developed an android application during my university years. But like most juniors I was moving away from the concept of “security”. Now, Instead of to start over everything, I will continue where I left off and connect with the security industry…
I haven’t made any planning how this series will progress. I will carry every subject I wonder and practice here. So random… Today, we will decompile a randomly selected apk, then make some changes in the relevant application and compile it again.
Let’s start !
Decompile
To decompile is to convert executable (ready-to-run) program code (sometimes called object code ) into some form of higher-level programming language so that it can be read by a human.
https://whatis.techtarget.com/definition/decompile

In the picture above you see a truck built with lego pieces. We can understand that this is a truck, we can use this function if it assumes that the wheels are moving, so we can drive. But we don’t know how many lego pieces are here? So how can we analyze this, how many can we find out?

Of course, you can find it by restoring it. We split into pieces and for example, analyze how many yellow lego pieces there are and how many blue lego pieces there are. Here you can see the concept of decompile in Figure-2…
We know that applications installed on Android devices are .apk extensions. It is actually a file compression format in APK. Just like RAR and ZIP formats. Of course, this is available in tools to extract the .apk file format.

DEX(Dalvik Executable) format is used to run applications developed for the Android operating system. Inside all APK files is a file called classes.dex. It is essentially all of the application logic and a file containing bytecodes. These byte codes contain third party libraries and multiple .class files. Java source files in an Android project are first compiled to .class. So when the .class is decompiled, java codes will appear.
We’d better get into practice without drowning in more theoretical knowledge. We will use jadx for dex to java… I will use the command line and GUI tool called jadx while extracting .apk files. You can download the tool from the link below;
jadx – Dex to Java decompiler
After applying the installation details in the link, download any apk file and decompile it. For example;

It performed the jadx decompile process over the classes.dex file in the APK. You can often get some errors when converting to Java format. For example, 17 errors seem to be received while performing dex to java operation.
Let’s decompile apk via jadx-gui. Thus, we can analyze the content more easily on GUI…
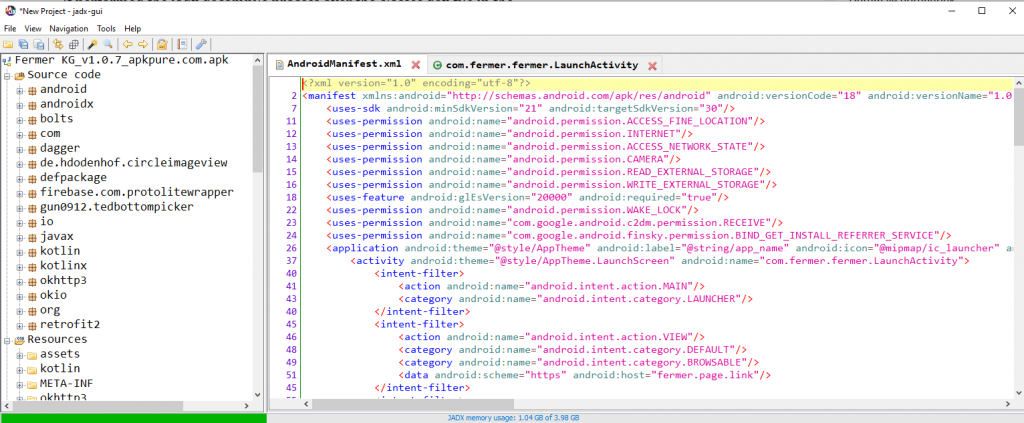
You may have noticed that the concept of smali is not mentioned in the paragraph above. In fact, smali is the readable version of the classes.dex file. My goal with jadx was to examine codes statically. That is the type of analysis we will do without installing and running the application.
So why do I need to convert it to smali format? Because as I mentioned in the previous paragraph, you may encounter some errors in dex to java operations. In such cases, it would be more accurate to review the code in smali format.
I will decompile the smali format from the classes.dex file with apktool. The decompile tool like Jadx but we will use this tool for dex to smali… You can find the appropriate setup stages according to your operating system from the link below.
https://ibotpeaches.github.io/Apktool/install/
Apktool

Modify Smali
We broke our Legos into pieces. Let’s add an extra lego piece now.
We decompiled the application in both java and smali format. Now let’s analyze the AndroidManifest.xml file over jadx-gui. The permissions, package information, components that the application will take on the device contain information in this file.
<activity android:theme="@style/AppTheme.LaunchScreen" android:name="com.fermer.fermer.LaunchActivity">
    <intent-filter>
        <action android:name="android.intent.action.MAIN"/>
        <category android:name="android.intent.category.LAUNCHER"/>
    </intent-filter>
It represents the entry point of an activity that you define to the MAIN action. The defined activity is com.fermer.fermer.LaunchActivity. The reason why I explain this is; I want to make changes through the running activity when the application is first opened. Let’s find the relevant activity by going to the sources directory where the source code is located.
For the following onCreate method in LaunchActivity;
public void onCreate(Bundle bundle) {
    super.onCreate(bundle);
    Intent intent = getIntent();
    Intrinsics.checkExpressionValueIsNotNull(intent, "intent");
    String action = intent.getAction();
    Intent intent2 = getIntent();
    Intrinsics.checkExpressionValueIsNotNull(intent2, "intent");
    Uri data = intent2.getData();
    Intent intent3 = getIntent();
    Intrinsics.checkExpressionValueIsNotNull(intent3, "intent");
    MainActivity.Companion.start(this, action, data, intent3.getExtras());
    finish();
}
For the following onCreate method’s smali code;
.method protected onCreate(Landroid/os/Bundle;)V
    .locals 5

    .line 10
    invoke-super {p0, p1}, Landroidx/appcompat/app/AppCompatActivity;->onCreate(Landroid/os/Bundle;)V

    .line 12
    sget-object p1, Lcom/fermer/fermer/presentation/main/MainActivity;->Companion:Lcom/fermer/fermer/presentation/main/MainActivity$Companion;

    move-object v0, p0

    check-cast v0, Landroid/content/Context;

    invoke-virtual {p0}, Lcom/fermer/fermer/LaunchActivity;->getIntent()Landroid/content/Intent;

    move-result-object v1

    const-string v2, "intent"

    invoke-static {v1, v2}, Lkotlin/jvm/internal/Intrinsics;->checkExpressionValueIsNotNull(Ljava/lang/Object;Ljava/lang/String;)V

    invoke-virtual {v1}, Landroid/content/Intent;->getAction()Ljava/lang/String;

    move-result-object v1

    invoke-virtual {p0}, Lcom/fermer/fermer/LaunchActivity;->getIntent()Landroid/content/Intent;

    move-result-object v3

    invoke-static {v3, v2}, Lkotlin/jvm/internal/Intrinsics;->checkExpressionValueIsNotNull(Ljava/lang/Object;Ljava/lang/String;)V

    invoke-virtual {v3}, Landroid/content/Intent;->getData()Landroid/net/Uri;

    move-result-object v3

    invoke-virtual {p0}, Lcom/fermer/fermer/LaunchActivity;->getIntent()Landroid/content/Intent;

    move-result-object v4

    invoke-static {v4, v2}, Lkotlin/jvm/internal/Intrinsics;->checkExpressionValueIsNotNull(Ljava/lang/Object;Ljava/lang/String;)V

    invoke-virtual {v4}, Landroid/content/Intent;->getExtras()Landroid/os/Bundle;

    move-result-object v2

    invoke-virtual {p1, v0, v1, v3, v2}, Lcom/fermer/fermer/presentation/main/MainActivity$Companion;->start(Landroid/content/Context;Ljava/lang/String;Landroid/net/Uri;Landroid/os/Bundle;)V

    .line 14
    invoke-virtual {p0}, Lcom/fermer/fermer/LaunchActivity;->finish()V

    return-void
.end method
I want to add a Log after the onCreate method corresponding to the 15nd line in the java code. But I cannot do this because I do not know the code structure of smali. For this, I will use the java2smali plugin in Android Studio. In a project I created as an example, I will be able to learn the smali equivalent of Log, which I added as java code.
You can find the related plugin below;
https://github.com/ollide/intellij-java2smali
java2smali
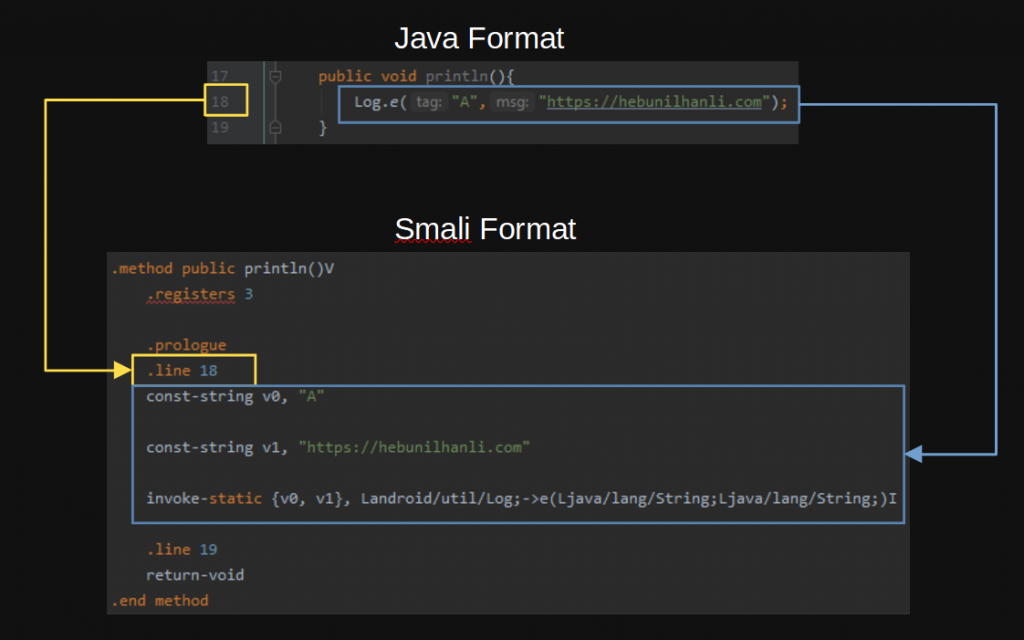
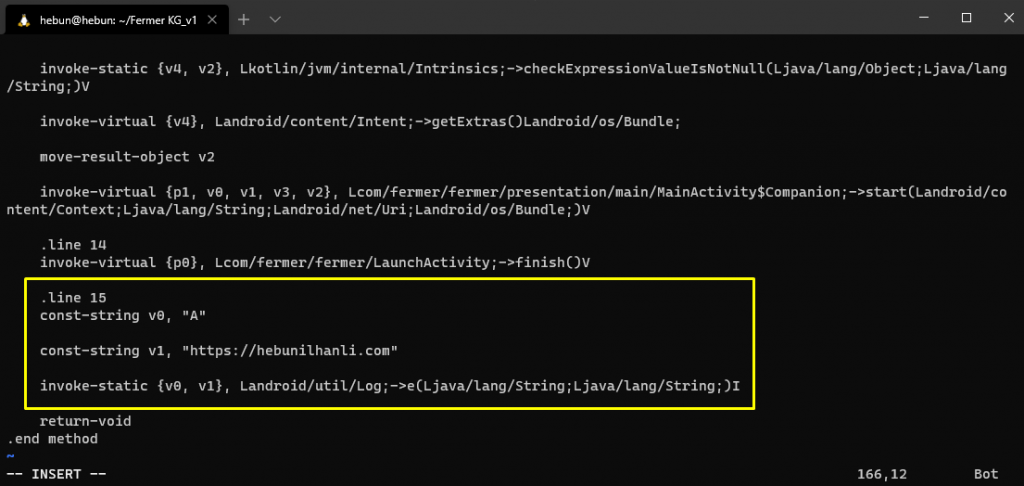
In the folder where I perform dex to smali operation in Figure – 5, I add the smali format of the Log to the MainActivity.smali after .line 14.
Recompile and Sign APK
It’s time to combine all the pieces with the newly added lego piece…
Apktool can do compile operation as well as decompile operation. In this process, the application will be packaged in APK format again. Then the edited apk will be in the dist directory of the decompiled folder.

In order to install the application to the virtual machine, the APK must be signed. Let’s create a self-signed certificate via keytool. Do not forget the password you enter while creating the certificate. A little later we will use the same password when signing the APK.
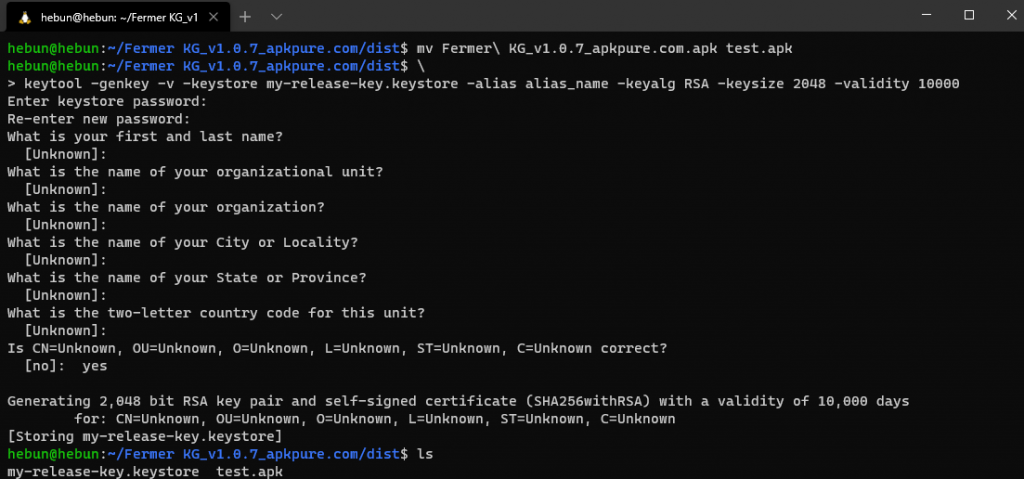
We can now sign the APK with a self-signed certificate. We will use a tool called jarsigner at the signing stage.
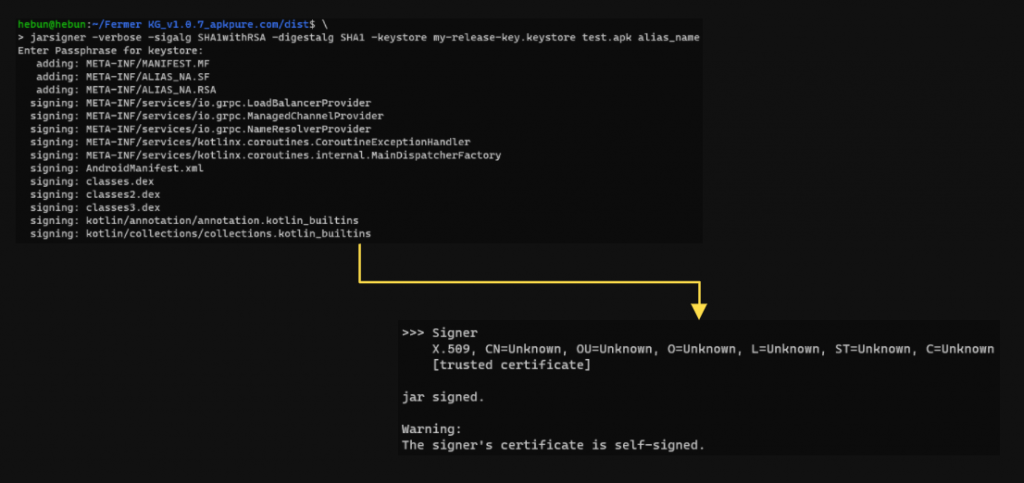
Recompile and signing process has been completed. Now let’s install the application on the virtual device with adb and follow the Logs. The adb tool is a tool used to communicate with the device/emulator.
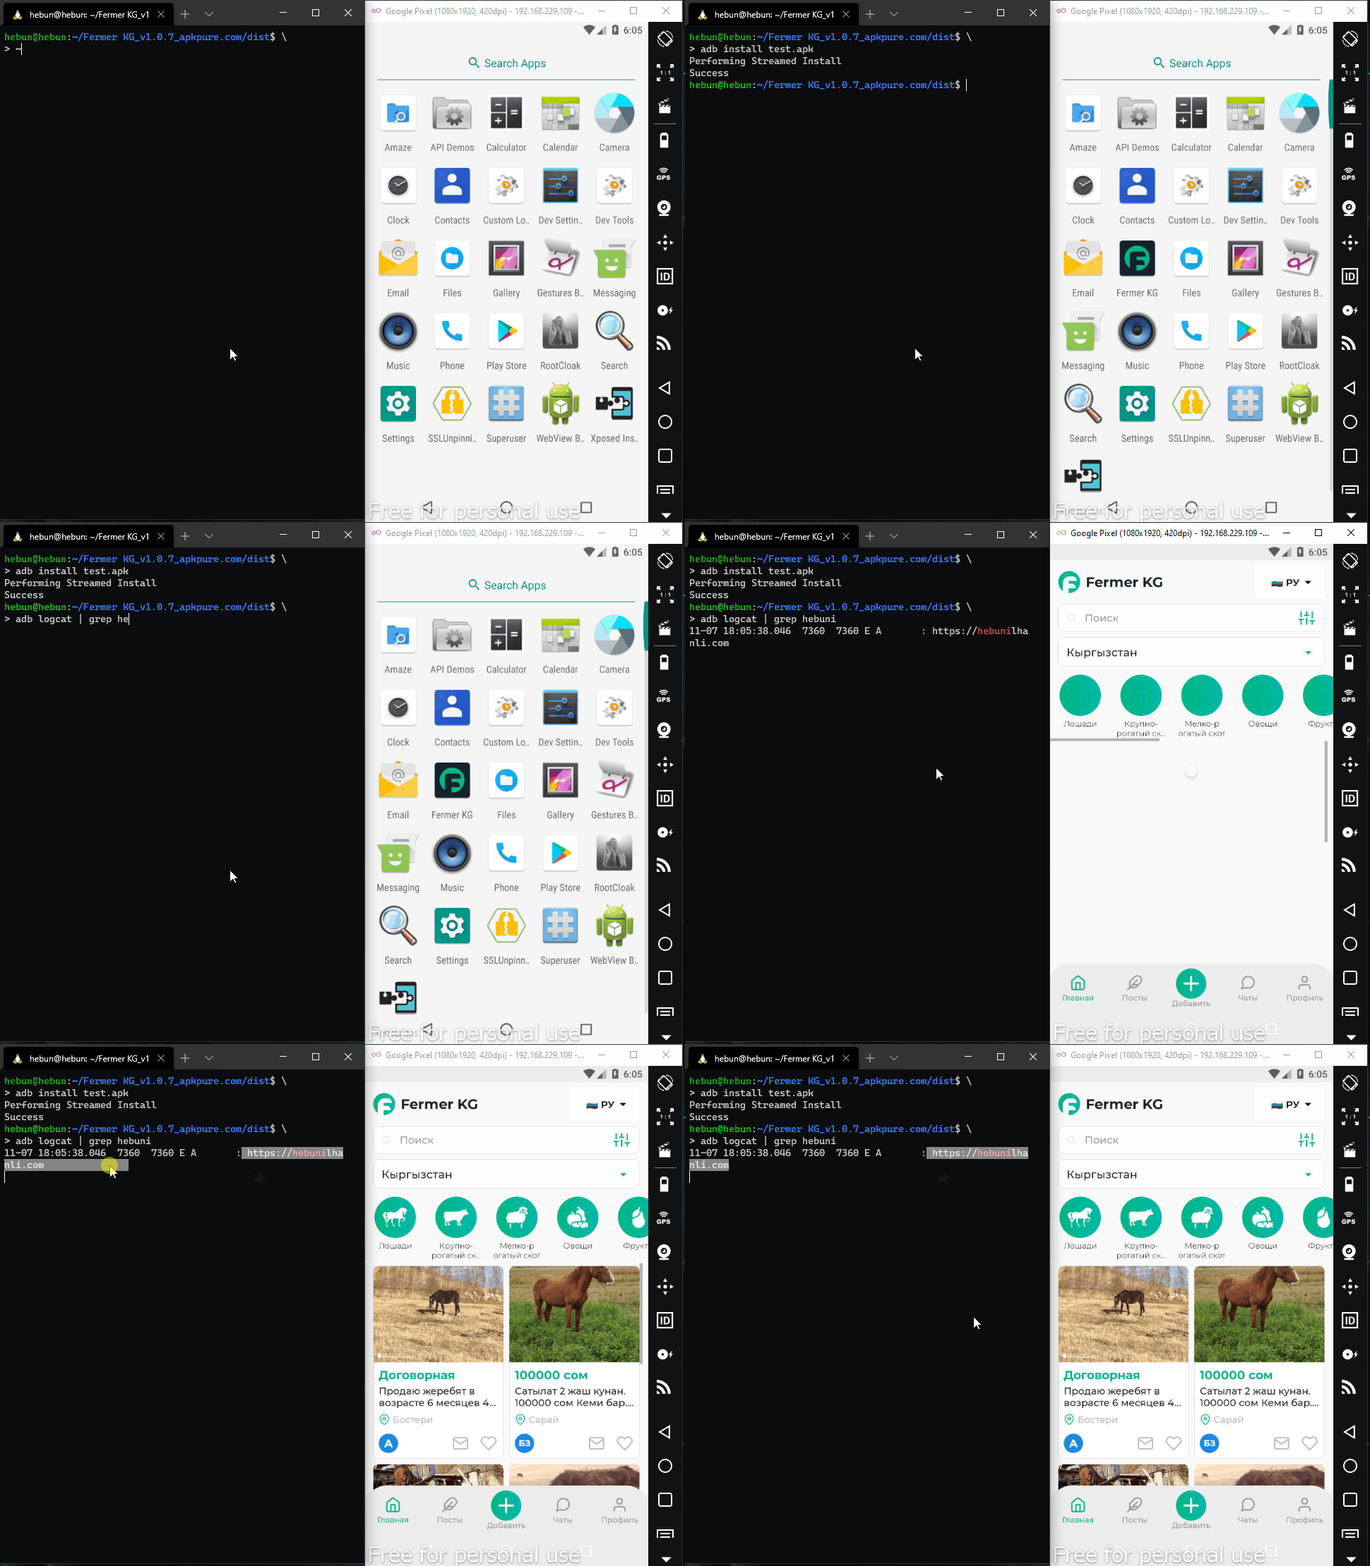
So why did we do this?
Sometimes there will be security measures within the application. For example, we may not be able to capture HTTPS requests over burpsuite. This is due to SSLPinning. In this case, there will be a time when we cannot use the ready scripts and we will edit in smali format to bypass it. We will also edit in smali format to bypass applications with root detection. Or we will do decompile operations while analyzing malware. Because of these situations, I wanted to share this article with you. I think, It was a good start. I hope it was useful…
See you again…

